Motive
Recently, I've been researching State Machines and how to use them in Godot. I wanted to share what I've learned, some thoughts, and some code examples. I've consumed various sources and the implementation I ended up with is a bit of a mix of different ideas and approaches from all of them. Simply put, this is my opinionated take on how to implement State Machines in Godot, and I figured it might be useful to share.
State Machines
A State Machine is simply a programming pattern that lets you manage the state in an organized way. It consists of a set of states, transitions between those states, and actions that happen when entering, exiting, or transitioning between states.
They're a phenomenal tool for managing complex behavior. Below are some benefits:
- Improved organization and maintainability
- States are decoupled from each other. To extend behavior, only the relevant state needs to be touched
- Transitions are explicit and easy to follow, which helps debugging
State Machines are best when you have a handful of distinct states an object can be in.
If you've ever had a massive _physics_process full of nested if-statements checking whether the player is jumping, running, attacking, or stunned all at once, you might realize the value they provide.
Two Approaches
There are two main ways to do State Machines in Godot: the Enum approach and the Node approach. The Enum approach is simpler and works well for small cases. The Node approach is more powerful but adds some overhead. There are more nodes in the scene tree, more setup cost, and some jumping around when debugging. If you're not reusing state logic or don't need per-state encapsulation, Node is probably overkill. Start with Enum, and only upgrade when you feel the burn.
Enum State Machine
To make the Enum Machine, define your states as an enum, track the current state in a variable, and use a match block in _process to run the right logic each frame.
A changeState() function handles transitions, fires a signal, and is where you'd put any enter/exit logic.
You can see this in the example below.
This is best for simple cases such as a door that's either open or closed, a switch with a few modes, anything with 2-5 states and no complex per-state behavior, etc. It is very lightweight and readable while still providing some structure and organization. Once states start needing their own helper functions, or you find yourself copying transition logic across multiple objects, that's probably a sign to move to the Node approach.
extends Node

# simple enum state machine
# good for small, self-contained state logic

enum EnumState {
	On,
	Off
}

signal stateChanged(old, new)

var currentState
var prevState

func _ready() -> void:
	currentState = EnumState.Off

func _process(delta: float) -> void:
	match currentState:
		EnumState.On:
			pass # logic for being on
                        # handle_on_state(delta) <- optional helper functions to keep it clean
		EnumState.Off:
			pass # logic for being off
		_:
			pass

func changeState(newState: EnumState) -> void:
	if currentState == newState:
		return

	# exit logic for the old state
	match currentState:
		pass

	prevState = currentState
	currentState = newState

	# enter logic for the new state
	match currentState:
		pass

	stateChanged.emit(prevState, newState)
Node State Machine
The Node approach gives each state its own script and node in the scene tree.
A central StateMachine node manages the current state, delegates _process/_physics_process/input calls down to it, and handles transitions.
This keeps every state fully self-contained and makes the whole thing much easier to extend.
There are three pieces: the State base class, the StateMachine manager, and the individual state scripts.
The player (or whatever object you're managing) owns the StateMachine as a child node and just forwards its process calls into it.
State Base Class
Each state extends the base class below.
It defines the interface. enter(), exit(), and the three process methods as empty overrideable functions.
The parent and machine references are dependency injected by the StateMachine on setup, so any state can access the character it's running on and trigger transitions.
class_name State extends Node

var stateName: String = "BASE"

var parent: Node      # set by the state machine on setup
var machine: StateMachine

func enter() -> void:
	pass

func exit() -> void:
	pass

# processInput is better for event-driven actions (button presses)
# movement-related input usually works better in processPhysics
func processInput(_event: InputEvent) -> void:
	pass

func processPhysics(_delta: float) -> void:
	pass

func processFrame(_delta: float) -> void:
	pass
StateMachine
The StateMachine iterates its children on setup, registers each state by name, and sets the parent and machine references on all of them.
From then on it just holds the current state and routes process calls into it.
changeState() calls exit() on the old state and enter() on the new one before swapping.
States are keyed by their stateName lowercased, and changeState() also lowercases the input before lookup, so casing in state scripts is normalized automatically.
Using strings instead of typed node references keeps the it flexible.
Any state can trigger a transition to any other state without needing a direct reference to it.
class_name StateMachine extends Node

signal stateChanged(old, new)

@export var initialState: State
@onready var states = {} # stateName (str) -> State

var prevState: State
var currentState: State
var parent: Node

func setup(parentNode: Node) -> void:
	var childStates = get_children()
	if len(childStates) == 0:
		return

	for state in childStates:
		state.parent = parentNode
		state.machine = self
		var key = state.stateName.to_lower()
		if states.has(key):
			push_warning("StateMachine: duplicate state name '%s'" % key)
		states[key] = state

	changeState(initialState.stateName)


func processInput(event: InputEvent) -> void:
	if currentState:
		currentState.processInput(event)

func processPhysics(delta: float) -> void:
	if currentState:
		currentState.processPhysics(delta)

func processFrame(delta: float) -> void:
	if currentState:
		currentState.processFrame(delta)


func changeState(newStateName: String):
	if newStateName not in states:
		return

	var newState = states.get(newStateName.to_lower())
	if !newState or newState == currentState:
		return

	if currentState:
		currentState.exit()

	prevState = currentState
	currentState = newState
	currentState.enter()

	stateChanged.emit(prevState, newState)
Player Example
The player script is pretty simple in this example.
It calls stateMachine.setup(self) in _ready() to pass itself as the parent, then just forwards its process callbacks into the machine.
All the actual behavior lives in the state scripts.
One benefit of this design is that you can do things in the process methods before handing off to the state machine, such as handling global cooldowns, checking for death, or whatever else should run regardless of the current state.
class_name StatePlayer extends CharacterBody2D

@onready var stateMachine = $StateMachine

func _ready() -> void:
	stateMachine.setup(self)

func _unhandled_input(event: InputEvent) -> void:
	stateMachine.processInput(event)

func _physics_process(delta: float) -> void:
	stateMachine.processPhysics(delta)

func _process(delta: float) -> void:
	stateMachine.processFrame(delta)
The Idle State
The idle state handles gravity when airborne, transitions to jump on a jump input, transitions to move if there's horizontal input, and decelerates the player otherwise.
It accesses the player through parent and triggers transitions through machine.changeState().
extends State

func _ready():
	stateName = "idle" # state names are internal FSM identifiers, not inspector-facing

func processPhysics(delta: float):
	if not parent.is_on_floor():
		parent.velocity += parent.get_gravity() * delta

	if Input.is_action_just_pressed("ui_accept") and parent.is_on_floor():
		machine.changeState("jump")

	var direction = Input.get_axis("left", "right")
	if direction != 0:
		machine.changeState("move")
	else:
		parent.velocity.x = move_toward(parent.velocity.x, 0, 300.0)

	parent.move_and_slide()
The jump and move states follow the same pattern. Each one just handles its own input checks and transitions.
The jump state sets the velocity on enter() so the jump happens exactly once when the state is entered, not every frame.
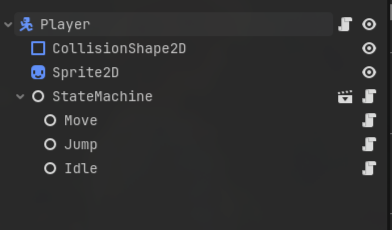
In the scene tree, the StateMachine node has Idle, Move, and Jump as children, each with their respective scripts attached.
The initialState export on StateMachine gets set to the Idle node in the inspector.
That's all the wiring needed.
Things to Watch Out For
The system above is clean, but there are a few "gotchas" worth knowing when using it.
-
If
initialStateis not set in the inspector,setup()will crash when it tries to readinitialState.stateName. -
If two child nodes share the same
stateName, the second one silently overwrites the first and that state just disappears. The setup code above callspush_warning()to catch this, but it's still worth keeping an eye on. -
Calling changeState() inside enter() or exit() is risky.
It works technically, but you're swapping states mid-transition, which can produce confusing behavior or infinite loops.
If you need to chain transitions,
call_deferred("changeState", ...)is a bit safer. -
If certain transitions should be blocked under specific conditions, the cleanest place to handle that is in the state's
processPhysicsbefore callingmachine.changeState(). You can also add a guard check at the top ofchangeState()itself if the condition is global.
Sources
Below are the main sources I used when building out this implementation. If this writeup didn't click for you, or you want to go deeper, check these out.